This is the the 9th blog post in the series about Azure Arc enabled Data Services.
The initial post can be found at Azure Arc for Data Services, part 1 – Intro and the whole collection can be found at Azure Arc enabled Data Services.
In this post we shall finally start focusing on what Azure Arc enabled Data Services are meant to do – to deliver you the finest (data) services wherever you are running your business, through the help of the one of the supported Kubernetes Distributions.
SQL Managed Instance is one of the 2 initial services that are supported and expected to make to GA (General Availability) this year, with the other one being PostgreSQL Hyperscale.
To start deploying a SQL Managed Instance, we shall need to make use AZDATA cli command AZDATA ARC SQL MI CREATE:
azdata arc sql mi create -n sql20

On different Kubernetes Clusters and with different Node capacities I have seen an average of around 2 minute deployment time for the SQL Managed Instance to appear.
Yes, that a 3 pod Linux installation on Kubernetes cluster with just a rather simple command, that takes 2 minutes – less time than most Windows System require for the reboot.
Note that if we would need to
On the picture below, you can see the pods, the IPs(removed), ports and the stateful sets with the help of the KUBECTL command “get all”:
kubectl get all -n arc

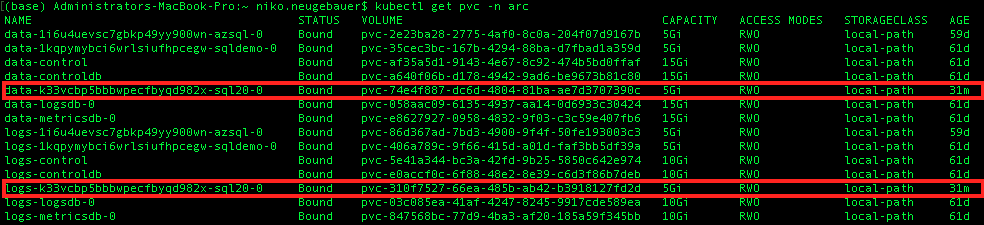
To see the created volumes (PVCs aka Persistent Volume Claims) we can use the following command, with the respective 5GB PVCs created for Data & Log marked with a red rectangle:
kubectl get pvc -n arc
Seems like a treat, right ?
How can we check on the configuration you might ask …
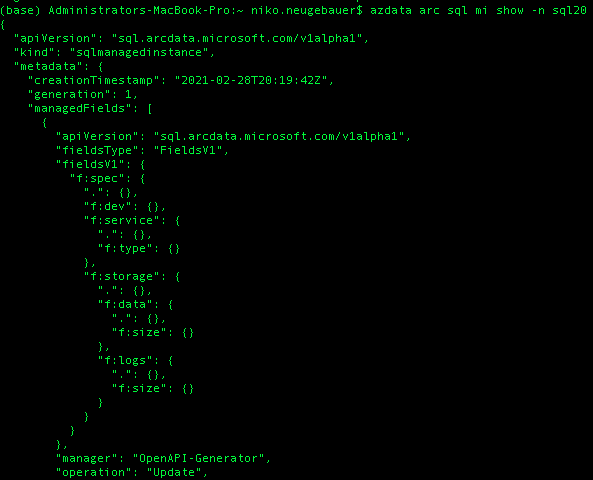
Very easy! Using the very same AZDATA ARC SQL MI command SHOW:
azdata arc sql mi show -n sql20
After removing the unnecessary and sensitive information here is how the output will look:
The last section that will include connection points for the applications and/or SQL Server Management Studio and/or Azure Data Studio, plus the endpoints for the Web Connection to Grafana and Kibana:

In this blog post I will rather go and use SQLCMD utility, which is available on the most major modern operation systems, such as OS X, Linux and Windows:
sqlcmd -S XXX.XXX.XXX.XXX,31112 -U sqladmin -P Yes1234567I%M794SSW0rD:;
and executing the “hello world” on the SQL Server command in the next step:
SELECT @@VERSION;
GO
will produce the following result:

It is interesting to notice that we are still using the Managed Instance from the September build of the 2020, even though it is installed in my case on the last day of the February of 2021. :)
But yes, this is definitely an SQL Managed Instance running Ubuntu, on Kubernetes …
To be even more sure that this is not some SQL Server 2019 build, lets create a new database and check it’s default compatibility level:
CREATE DATABASE Test;
GO
select compatibility_level, name from sys.databases;
GO

Yes, that is totally correct – the unattainable for the non-PaaS SQL Services compatibly level 160 is the default one, which is corresponding to the yet unannounced SQL Server vNext (after SQL Server 2019).
Wonderful, isn’t it ?
List SQL Managed Instance
In order to list created SQL Managed Instances, we shall use the azdata arc sql mi list command:
azdata arc sql mi list
In my case I have already had another SQL Managed Instance created previously, the one that is called AZSQL, but the second one is the one we just have created:

To delete a SQL Managed Instance we can always use the azdata arc sql mi DELETE command:
azdata arc sql mi delete -n sql20
![]()
with a very important notice that the persistent volumes are not really removed by this operation!
To list the available PVCs, let’s list their names through the KUBECTL command and then GREP them by the node name (sql20)
kubectl get pvc -n arc -o name | grep sql20
After listing we can go and individually remove them with kubectl delete pvc [listed-pvc-name] -n [namespace] command
kubectl delete pvc data-k33vcbp5bbbwpecfbyqd982x-sql20-0 -n arc
kubectl delete pvc logs-k33vcbp5bbbwpecfbyqd982x-sql20-0 -n arc

That’s pretty much it all for the basics of the SQL managed Instance creation and deletion. I might expand this post with the tool usage that is done through Azure Data Studio one day.
In the next post, I shall focus on the customisation of SQL Managed Instance configuration and Management.
to be continued with Azure Arc enabled Data Services, part 10 – Configuring SQL Managed Instance