This is my all time first post on the matter of PowerQuery, even though I have been playing and presenting it since it was publicly available almost a year ago (March 2013).
First of all I have to recognise Andreas Fischer from OH22 for helping me out with my current tasks and so they went extremely smoothly through the day, and then when I decided to finally play with Exchange and there were configuration troubles for my current user setup – he was the one who solved it while we were talking on the Lync.
I wish more SysAdmins could be competent & proactive like him.
If I am not mistaken, it was in December of 2013 when Microsoft has launched Power Query support for Exchange, and so since that time I was thinking about writing this post, and today is the day when I am bringing it finally to completion.
The story is that any SQL Server DBA can analyse the results of the SQL Agent jobs from the Server to which he/she has access to, right? In theory it just a couple of clicks away, but in the practice it will take way too much time to do that. A lot of critical job results are being delivered to some Exchange mailbox right after each execution, those emails like a spam being deleted by the respective admins (as long as they see that the jobs are being run with success, naturally).
Well, let us be honest – most of the time nobody analyses a thing, because it is one thing to tell to a non-professional a story about how easy it is to do, but then should one be really challenged/asked to …
Other situation is when a BI professional is being asked about some specific ETL process data, for example, and its analysis might be something that might need to be done on a regular basis.
As the world moves into a new phase and a pure BI / DEV / DBA positions cease to exist, we have to find new ways and solutions.
An easy solution
 An easy solution that I have found for myself is to route email to a specific mailbox, directing to a folder from data can be read. Fire away a new sheet of Excel supercharged with a version of Power Query from Microsoft’s Power BI solution, reformat and process the data and all you need to set up is a simple Dashboard with Pivot Charts & Tables.
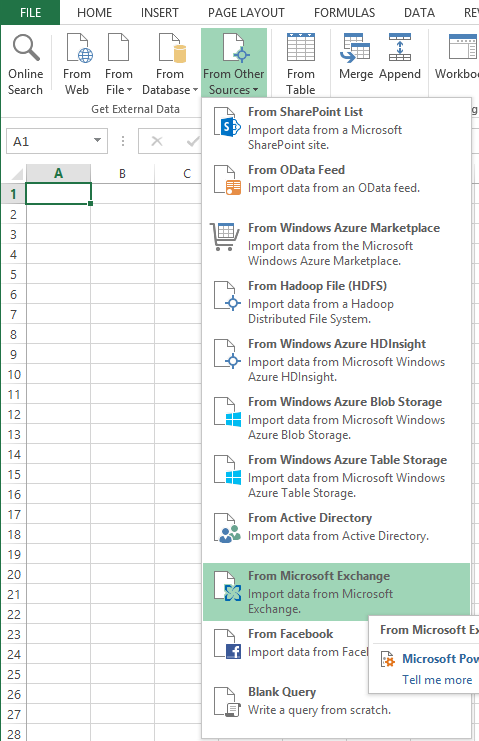
In my case I have opened an Excel 2013 with PowerQuery from January 2014, select Power Query ribbon and at from “From Other Sources” select “From Microsoft Exchange” option, like shown at the screenshot.
 Next Step you should see would be the login screen where you will have to specify your email as well as the password (Note: should you have a different login from your email address, than it looks like Exchange integration needs to improve in this area:) ). You might receive an additional screen for the confirmation of your Exchange Autodiscovery address.
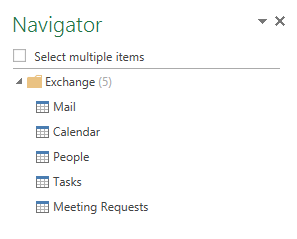 Next thing you will see, shall be a navigator screen on the right side of your excel sheet, which will allow you to select 1 or multiple sources for the processing. For this exercise I selected mails, since I am looking into processing & analysing them. Double click on the item and you will be taken to the screen for Power Query process.
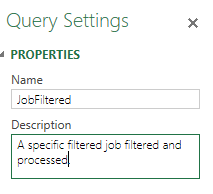 I set up the name for our query and a small description as well, as you can see on the screenshot. I always suggest set more description since it might help you in a matter of a couple of months, when revisiting your own solutions.
At this point you should have some kind of a similar view on Power Query UI, I have naturally cut it down to the first line in order not to show you the whole content of my mailbox:
![]()
There are a lot of columns to be analysed, where some of them are composite – meaning that you can expand them in order to get even more data.
My next step will be to read mail only in the “Jobs” Subfolder, and so I will filter them out at the GUI or by writing the command for the M language:
FilteredRows = Table.SelectRows(Mail1, each ([Folder Path] = "\Jobs\")),
Next step is to make sure that we are analysing only the specific jobs we are interested in (MySuperAnalysisJob):
FilterOutJob = Table.SelectRows(FilteredRows, each Text.Contains([Subject], "MySuperAnalysisJob")),
After this, let’s remove all those columns which will not be used, since a lot of interesting information is contained inside email’s body tag:
RemovedColumns = Table.RemoveColumns(FilterOutJob,{"Id", "DisplayTo", "DisplayCc", "CcRecipients", "BccRecipients", "Importance", "IsRead", "HasAttachments", "Sender", "ToRecipients", "Categories", "Attachments", "Attributes", "Subject", "Folder Path"}),
Now expand the content of the body tag by selecting a simple text part:
#"Expand Body" = Table.ExpandRecordColumn(RemovedColumns, "Body", {"TextBody"}, {"Body.TextBody"}),
At this point you should be see a pretty similar picture to what is shown on the screenshot below:
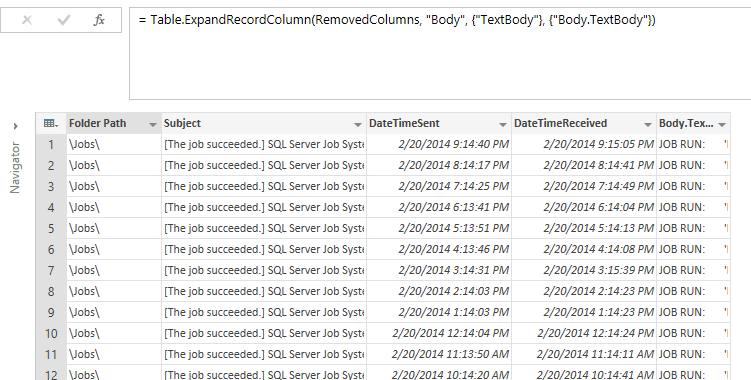
As for the content of our text field, here is something similar that you should be able to see, if you are using SQL Server Agent Jobs:
![]()
We have here exactly what is interesting – execution time, duration, execution status, schedule & the last executed step – perfect! :)
Now let us split it into 5 different columns by using Split function and selecting the TAB delimiter and let’s name them TitleToRemove,ExecutionTime,DurationTime,ExecutionStatus and SchedulleAndLastStep:
SplitColumnDelimiter = Table.SplitColumn(#"Expand Body","Body.TextBody",Splitter.SplitTextByDelimiter("#(tab)"),{"TitleToRemove", "ExecutionTime", "DurationTime", "ExecutionStatus", "ScheduleAndLastStep"}),
Next 2 steps will allow us to extract the exact execution time from the ExecutionTime column (we split it again by using the custom words “at ” as a right-most delimiter :
ExecutionTimeExtracted = Table.SplitColumn(SplitColumnDelimiter,"ExecutionTime",Splitter.SplitTextByEachDelimiter({"at "}, null, true),{"ExecutionDate", "ExecutionTime"}),
and since the ExecutionTimeExtracted is actually hiding more content (DURATION word), which is revealed only after selecting one of the cells, as you can see on the following screenshot:
![]() , we need to split the column again and this time we should simply specify the word contained in the text:
, we need to split the column again and this time we should simply specify the word contained in the text:
RemoveDurationFromExecutionTime = Table.SplitColumn(ExecutionTimeExtracted,"ExecutionTime",Splitter.SplitTextByEachDelimiter({"DURATION"}, null, false),{"ExecutionTime", "ColToRemove"}),
We apply the very principle to the ExecutionDate column:
RemoveDurationFromExecutionDate = Table.SplitColumn(RemoveDurationFromExecutionTime ,"ExecutionDate",Splitter.SplitTextByEachDelimiter({"on "}, null, false),{"OneMoreToRemove", "ExecutionDate"}),
Now we can remove all the “garbage” columns produced during the previous phases of ExecutionDate and ExecutionTime extraction:
RemovedSplittedColumns = Table.RemoveColumns(RemoveDurationFromExecutionDate,{"TitleToRemove", "OneMoreToRemove", "ColToRemove"}),
The last 2 step which we need to do are simply to convert the respective columns to Date & Time types, which in my specific case I had to implement using German locale (de-DE) for ExectuionDate column.
    ChangedTypeWithLocale = Table.TransformColumnTypes(RemovedSplittedColumns , {{"ExecutionDate", type date}}, "de-DE"),
    ChangedType = Table.TransformColumnTypes(ChangedTypeWithLocale,{{"ExecutionTime", type time}})
Durations:
For extracting durations we need to follow a similar pattern, by splitting data by with the following command at M language (We shall get 3 columns – Hours, Minutes and Seconds):
SplitDurations = Table.SplitColumn(ChangedType,"DurationTime",Splitter.SplitTextByDelimiter(","),{"Hours", "Minutes", "Seconds"}),
After that we just need to sub-split each of the columns into
    SplitDurationHours = Table.SplitColumn(SplitDurations,"Hours",Splitter.SplitTextByEachDelimiter({" "}, null, false),{"Hours", "HoursToRemove"}),
    SplitDurationMinutes = Table.SplitColumn(SplitDurationHours,"Minutes",Splitter.SplitTextByEachDelimiter({" "}, null, true),{"Minutes", "MinutesToRemove"}),
    SplitDurationSeconds = Table.SplitColumn(SplitDurationMinutes,"Seconds",Splitter.SplitTextByEachDelimiter({" seconds"}, null, false),{"Seconds", "SecondsToRemove"}),
After that let’s change the type of all 3 new columns into an integer and then remove the columns which were named to be removed (since they contain no valuable info):
    ChangeDurationTypeToNumber = Table.TransformColumnTypes(SplitDurationSeconds,{{"Hours", type number}, {"Minutes", type number}, {"Seconds", type number}}),
    RemoveGarbageColumns = Table.RemoveColumns(ChangeDurationTypeToNumber,{"HoursToRemove", "MinutesToRemove", "SecondsToRemove"}),
Execution Status:
For execution status extraction it will be enough to split the source column and then to remove the garbage, since there are no necessary transformations or status casts:
    JobExecutionStatus = Table.SplitColumn(RemoveGarbageColumns,"ExecutionStatus",Splitter.SplitTextByEachDelimiter({"MESSAGES:"}, null, false),{"ExecutionStatus", "StatusToRemove"}),
    RemovedStatusGarbage = Table.RemoveColumns(JobExecutionStatus,{"StatusToRemove"})
Now let’s close the Power Query interface and you should be able to see a similar view (given that your jobs and emails are different):

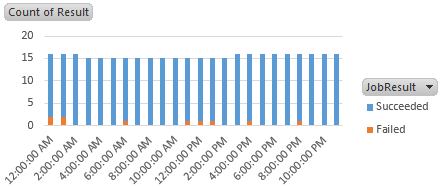
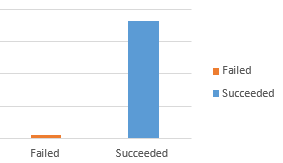
From here on you can easily build your own Pivot Table and Pivot Charts, my start point is here :

And so here is the full query, feel free to use it and enhance (the step and the schedule part is still not being expanded :)):
let
    Source = Exchange.Contents(),
    Mail1 = Source{[Name="Mail"]}[Data],
    FilteredRows = Table.SelectRows(Mail1, each ([Folder Path] = "\Jobs\")),
    FilterOutJob = Table.SelectRows(FilteredRows, each Text.Contains([Subject], "MySuperAnalysisJob")),
    RemovedColumns = Table.RemoveColumns(FilterOutJob,{"Id", "DisplayTo", "DisplayCc", "CcRecipients", "BccRecipients", "Importance", "IsRead", "HasAttachments", "Sender", "ToRecipients", "Categories", "Attachments", "Attributes", "Subject", "Folder Path"}),
    #"Expand Body" = Table.ExpandRecordColumn(RemovedColumns, "Body", {"TextBody"}, {"Body.TextBody"}),
    SplitColumnDelimiter = Table.SplitColumn(#"Expand Body","Body.TextBody",Splitter.SplitTextByDelimiter("#(tab)"),{"TitleToRemove", "ExecutionTime", "DurationTime", "ExecutionStatus", "ScheduleAndLastStep"}),
    ExecutionTimeExtracted = Table.SplitColumn(SplitColumnDelimiter,"ExecutionTime",Splitter.SplitTextByEachDelimiter({"at "}, null, true),{"ExecutionDate", "ExecutionTime"}),
    RemoveDurationFromExecutionTime = Table.SplitColumn(ExecutionTimeExtracted,"ExecutionTime",Splitter.SplitTextByEachDelimiter({"DURATION"}, null, false),{"ExecutionTime", "ColToRemove"}),
    RemoveDurationFromExecutionDate = Table.SplitColumn(RemoveDurationFromExecutionTime ,"ExecutionDate",Splitter.SplitTextByEachDelimiter({"on "}, null, false),{"OneMoreToRemove", "ExecutionDate"}),
    RemovedSplittedColumns = Table.RemoveColumns(RemoveDurationFromExecutionDate,{"TitleToRemove", "OneMoreToRemove", "ColToRemove"}),
    ChangedTypeWithLocale = Table.TransformColumnTypes(RemovedSplittedColumns , {{"ExecutionDate", type date}}, "de-DE"),
    ChangedType = Table.TransformColumnTypes(ChangedTypeWithLocale,{{"ExecutionTime", type time}}),
    SplitDurations = Table.SplitColumn(ChangedType,"DurationTime",Splitter.SplitTextByDelimiter(","),{"Hours", "Minutes", "Seconds"}),
    SplitDurationHours = Table.SplitColumn(SplitDurations,"Hours",Splitter.SplitTextByEachDelimiter({" "}, null, false),{"Hours", "HoursToRemove"}),
    SplitDurationMinutes = Table.SplitColumn(SplitDurationHours,"Minutes",Splitter.SplitTextByEachDelimiter({" "}, null, true),{"Minutes", "MinutesToRemove"}),
    SplitDurationSeconds = Table.SplitColumn(SplitDurationMinutes,"Seconds",Splitter.SplitTextByEachDelimiter({" seconds"}, null, false),{"Seconds", "SecondsToRemove"}),
    ChangeDurationTypeToNumber = Table.TransformColumnTypes(SplitDurationSeconds,{{"Hours", type number}, {"Minutes", type number}, {"Seconds", type number}}),
    RemoveGarbageColumns = Table.RemoveColumns(ChangeDurationTypeToNumber,{"HoursToRemove", "MinutesToRemove", "SecondsToRemove"}),
    JobExecutionStatus = Table.SplitColumn(RemoveGarbageColumns,"ExecutionStatus",Splitter.SplitTextByEachDelimiter({"MESSAGES:"}, null, false),{"ExecutionStatus", "StatusToRemove"}),
    RemovedStatusGarbage = Table.RemoveColumns(JobExecutionStatus,{"StatusToRemove"})
in
    RemovedStatusGarbage